Showing posts with label dynamics gp. Show all posts

Sunday, July 1, 2012

Report Builder 3.0 WITHOUT SQL Reporting Services?

Most folks seem to associate the SQL Server 2008 R2 Report Builder (Report Builder 3.0) with SQL Server Reporting Services.  And, I suppose, rightly so.  I mean, if you use the Report Builder with SQL Server Reporting Services, you can deploy the reports you create to the Report Manager website and allow other users to access and run them.  But it seems like a lot of folks don't realize that you can actually use the Report Builder 3.0 much like the Crystal Reports designer application-- to create and run reports on your desktop (wtihout necessarily having SQL Server Reporting Services deployed and configured).

Why is this a good thing?  Well, some organizations don't necessarily have a need to deploy reports out to a number of users.  Sometimes, it's just one or two users who want to create and generate reports for themselves-- as opposed to developing reports for others.  In those situations, you can just download the Report Builder and get going!

Download Report Builder 3.0....
http://www.microsoft.com/en-us/download/details.aspx?id=6116

When you launch the Report Builder, you will be greeted with a Getting Started window like this:


If you choose the "New Report" option, you can then select a type of report to create and you will be guided through the process of creating a report (as opposed to choosing Blank Report, which will give you a blank canvas) to begin with.  Once the report is created, you can save the RDL file to your desktop or other shared location to be run again (just like you could save an RPT file and run the report in Crystal Reports).  Or, if you do have SQL Reporting Services configured, you can deploy the RDL to the Report Manager website (but, again, this is not required).

One other concept I should toss out there, if you are going to give Report Builder a whirl, and you have not previously worked with SQL Reporting Services-- the concept of Data Source -vs- Dataset.  In Report Builder and SSRS, you have a data source (just like you would with Crystal Reports) that stores the information necessary (e.g., database, server, user login) to connect to the database you want to report on.  But in Report Builder and SSRS, you then also have the concept of a Dataset.  In the most basic terms, the Dataset is the query used to pull information from the database.  For example, a dataset might select data from tables or views in your database.  Or it might execute a stored procedure to return results to be used on your report. If you choose to use one of the report wizards to create your report, you will be guided through the process of creating both a dataset and a data source for your report.  Also, I should note a couple interesting things about data sets...

1. You can create shared data sets to be deployed to SSRS and used on multiple reports
2. An individual report can actually contain multiple datasets, which can be unrelated...this is particular useful if you are designing a dashboard-style report with different information displayed in different regions of the report

Hope this little bit of introduction to Report Builder, and how you can start using it NOW, helps!

Christina Phillips is a Microsoft Certified Trainer and Dynamics GP Certified Professional. She is a supervising consultant with BKD Technologies, providing training, support, and project management services to new and existing Microsoft Dynamics customers. This blog represents her views only, not those of her employer.

Saturday, March 31, 2012

Great Stuff Coming For HR and PR in Dynamics GP 2013

So great to get some fabulous news about upcoming enhancements to the Human Resources and Payroll modules in Dynamics GP 2013 from Terry Heley at Microsoft.  On my list of things to be really excited about....

1.  Including the deduction, benefit, and pay code modifier tools directly in the product!  This is such a HUGE thing in terms of ease of use and end user satisfaction.  So you will be able to change pay codes, deduction codes, and benefit codes using these tools.  Very cool.

2.  Another one that scores high in my book when it comes to end user satisfaction is the option to turn off the printing of alignments for checks and earnings statements.  Yay!  We are moving up in the world and past the age of dot matrix printers that needed alignment :)

3.  All of the scripts I have saved over the years may not be needed any more, since we will also have the ability to edit pay history for FUTA, SUTA, and Workers Comp.  So if pay codes are set up incorrectly, you will be able to fix previous payrolls through the interface itself rather than using scripts, or having to back out and re-enter transactions. 

4. Enhancements for payroll extensions, too! We will be able to disable Deduction In Arrears reports from printing!  And Payroll Integration to Payables can summarize federal taxes in to a single voucher, to minimize the number of entries in payables (I just had a client last week who was thrown off by the number of vouchers created by federal tax, so this is a timely announcement in my book).
.
Lots of quality report fixes too, including those in Benefit Self Service in Business Portal (we love those bug fixes!)
Also, just a reminder that a 2012 Year End Update will be provided for Dynamics GP 20.0 customers, as well as Round 1 tax tables for US for 2013. Then that will be the end of mainstream support (no more tax updates or code updates), although extended support will continue through 10/10/2017.  As always, contact your Partner or Microsoft if you have specific questions about the product support lifecycle.

https://mbs.microsoft.com/customersource/support/selfsupport/hottopics/HOTTOPIC_MDGP10_SupportLifecycle
https://mbs.microsoft.com/partnersource/support/selfsupport/hottopics/HOTTOPIC_MDGP10_SupportLifecycle

Christina Phillips is a Microsoft Certified Trainer and Dynamics GP Certified Professional. She is a supervising consultant with BKD Technologies, providing training, support, and project management services to new and existing Microsoft Dynamics customers. This blog represents her views only, not those of her employer.

Thursday, March 22, 2012

Forecaster Line Sets With a Period

Back in the days of Forecaster 6.7, I used to really emphasize the need to avoid special characters when naming or entering just about anything.  There were such a myriad of issues caused by special characters, that even (.) periods were to be avoided.  Admittedly, I have loosened up a bit with Forecaster 7.0 but still try to remind users that special characters aren't a great idea in name/ID fields.  And so it was that this week, a special character (in this case, a period), once again was the cause of a lot of confusion in Forecaster.

So here is the scenario...

1.  Set up a line set, and end the name with a (.).  For example-- HR.
2.  Specify the line set as an override on the input set.
3.  Enter data in to the budget for the department.

All appears fine if you review the data in the input set (Data>>Input).  However, if you open the line set (Build>>Lines), it will appear blank.  All in all, this does not seem to cause an issue, unless....
you modify the line set.  So, in this case, our line set was blank but we needed to add a new account to it.  So we added a new account to the line set and saved it.

When we returned to Data>>Input, our input set (with the exception of the one new account we added) was now completely blank (account numbers and all).  And if we were to look at the line set in the database, it was also blank (with the exception of the one new account we added).

We were able to track it back to the fact that the line set ended with a period.  It doesn't appear to impact line sets that have a period in the middle of the name only.  And, if you happen to catch it BEFORE you make changes to the line set and save it, you can actually recover the line set by right-clicking and renaming it without the ending period.  However, if you make a change to the blank line set and save, you will have to recreate the line set.

While at Convergence, I was able to talk with Darian Hanson from support about this and hopefully it will end up as one of those odd little quality reports out there.  And, for now at least, it reminds me to be vigilant when it comes to special characters, even periods :)

Christina Phillips is a Microsoft Certified Trainer and Dynamics GP Certified Professional. She is a supervising consultant with BKD Technologies, providing training, support, and project management services to new and existing Microsoft Dynamics customers. This blog represents her views only, not those of her employer.

Back from Convergence 2012

So, next year, back to New Orleans for Convergence 2013.  Admittedly, I did like New Orleans a lot, although I have to say that San Diego has been my favorite. Overall it was a good Convergence, although I feel like it went by so quick.  Working in the hands on labs was fun as always, meeting with attendees, partners, and old friends.  This year we were closer to the product groups, so it was nice to spend some time chatting with all of those folks that dig us out of holes year after year after year.

I am very excited about Management Reporter 2012 for a number of reasons, including...
  • Improved performance across the board, including a datamart for AX and NAV
  • Drillback to Dynamics GP from a report (ala FRx)
  • Quick charts and comments allow users to collaborate on published reports
  • Multiple destinations for a report definition, including SharePoint and a network share
  • Identify missing accounts across all building blocks
Can't wait to get this in to place for our clients, so that the enthusiasm for MR can continue to build!

Christina Phillips is a Microsoft Certified Trainer and Dynamics GP Certified Professional. She is a supervising consultant with BKD Technologies, providing training, support, and project management services to new and existing Microsoft Dynamics customers. This blog represents her views only, not those of her employer.

Monday, March 12, 2012

Quick Journal Oddity

We had a client come up with an odd issue with quick journals, and my colleague Nathan Hayden spent some time researching the issue with Microsoft.  As it turns out, it is a quality report (with a low possibility of being resolved due to the low number of customers reporting the issue).

But, first, for those of you that are not familiar with quick journals...

A quick journal allows you to set up a self-balancing journal entry template.  So you enter all lines of the jounral entry except one, and the journal entry automatically balances to the specified offset account.  The templates are set up using Microsoft Dynamics GP-Tools-Setup-Financial-Quick Journal.  Entries are then enterered using Transactions-Financial-Quick Journal.

I have found over the years that most users prefer using recurring batches in Financial instead, especially now that you can choose to "Clear Recurring Amounts" when you set up the recurring batch, Transactions-Financial-Batches.  But some users do still prefer quick journals, which is how we ran across the issue.

The symptom that the client was reporting was that there were batches being left in the general ledger with no transactions.  The batch ID was the same as the quick journal ID, and the batch could not be selected in the Batch Entry window for deletion.  What we found is that this was caused by overriding the journal entry number in the Quick Journal Entry window before posting. Very odd.

Here are the details of the quality report:
4444 Empty Quick Journal Batch left behind in Fin. Series Post

Description: 1
1. Go to Setup--financial--quick journals.

2. Setup 2 new quick journals. Test1 and Test2 will work.

3. Go to Transactions--Financial--Quick journal

4. Using TEST1, enter 1 transaction (example: Journal ID 800) and click on the post button to post.

5. Using TEST1, enter another transaction (journal ID 801) and save it.

6. Using TEST2, enter another transaction (Journal ID 802) and save it.

7. Check Financial Series Post. Should see 2 batches (TEST1 and TEST2) with 1 transaction each.

8. Go back to quick journal. Select journal 801 from the lookup. Do not save it again and do not post it.

9. With 801 selected, manually type in 802 and click on the post button to post it.

10. Close the window and go back to Financial Series Post. You should see batch TEST1 with 1 transaction and TEST2 with 0 transactions.

Expected results, the batch should not be there if there are no transactions in it. Seems to only get left behind if the journal ID number is manually overridden and posted from the screen.

If you are experiencing this issue, contact support so you can be added to the quality report :)  Fortunately, it does not impact data integrity and you can delete the batch from the SY00500 table (always make a backup first, and then run SELECT * FROM SY00500 to locate the batch's dex_row_ID, and then run DELETE SY00500 WHERE DEX_ROW_ID=insert ID here).

Christina Phillips is a Microsoft Certified Trainer and Dynamics GP Certified Professional. She is a supervising consultant with BKD Technologies, providing training, support, and project management services to new and existing Microsoft Dynamics customers. This blog represents her views only, not those of her employer.

Wednesday, February 29, 2012

Loading Sales Tax Information

I recently was asked to help create Tax Schedules in Dynamics GP based on a spreadsheet of customers, zip codes, and corresponding city, state, and local tax rates.  I created a series of scripts to load the information from Excel, and I thought I would share these with you all in case anyone else could benefit from them :)  Now, in this case, the tax details were already loaded to Dynamics GP and the spreadsheet referenced the Tax Detail IDs.

Of course, big disclaimer, that you should always test, test, test, and backup, backup, backup when using these scripts.  I created a series of these scripts using the concatenate function in Microsoft Excel to pull in the data needed.  These scripts also assume that the tax schedules in GP have IDs that correspond to the customer zip codes.

--update descriptions for tax details, TX00201, as they were loaded with a generic ID
Update TX00201 Set TXDTLDSC='locality/tax detail description' where TAXDTLID='tax detail ID'

--create TX00102, Tax Schedule relationship to Tax Detail
--assumes static values for TXDTLBSE, TDTAXTAX, Auto_Calculate fields, if in doubt that these are correct for your situation, manually set up a tax detail and check the TX00102 to confirm the proper values
INSERT INTO TX00102 (TAXSCHID, TAXDTLID, TXDTLBSE, TDTAXTAX, Auto_Calculate) values ('zipcode/tax schedule ID', 'taxdetail ID',3,0,0)

--create TX00101, Tax Schedule records
INSERT INTO TX00101 (TAXSCHID, TXSCHDSC) values ('zipcode/tax schedule ID','area description/tax schedule description')

--update customer master tax schedule where the zip code (left 5 characters) match a tax schedule in GP
update RM00101 set rm00101.TAXSCHID=tx00101.TAXSCHID from RM00101 inner join TX00101 on left(RM00101.ZIP,5)=tx00101.TAXSCHID

--update customer master address tax schedule where the zip code (left 5 characters) match a tax schedule in GP
update RM00102 set rm00102.TAXSCHID=tx00101.TAXSCHID from RM00102 inner join TX00101 on LEFT(rm00102.ZIP,5)=tx00101.TAXSCHID

Christina Phillips is a Microsoft Certified Trainer and Dynamics GP Certified Professional. She is a supervising consultant with BKD Technologies, providing training, support, and project management services to new and existing Microsoft Dynamics customers. This blog represents her views only, not those of her employer.

Friday, January 27, 2012

Why care about User Classes?

With recent version of Dynamics GP, the user security model shifted away from user classes to security roles, tasks, and operations.  So, I am often asked why worry about user classes now? 


Microsoft Dynamics GP-Tools-Setup-System-User Classes
Users are assigned to a class in Setup-System-Users

Well, user classes still have a number of benefits in Dynamics GP.  I thought I would take you through some of them.
  1. You can assign shortcuts to an entire user class.  Simply log in to Dynamics GP as 'sa', and you will see on your navigation pane a folder for each user class.  Add a shortcut in to one of those folders, and it will appear on the navigation pane for all users that belong to the class.
  2. If you are using Account Level Security/Organizational Structures, you can assign an entire class to a branch of the organization structure, Cards-System-Organizational Tree.  This is especially useful when users are added to Dynamics GP, you can place them in to the correct class and they will automatically receive the associated account level security rather than having to assign their user individually to the organizational structure.
  3. If you use project accounting, you can restrict access to certain processes and activities in project accounting by user class.  Microsoft Dynamics GP-Tools-Setup-Project-User Classes.  You can control things like being able to change project status, change the billing type of a line item, or add a budget line item "on the fly" from a transaction.
Please feel free to share your own continued uses for User Classes.  These functions may not be important on all implementations, but in some cases User Classes can still be very helpful!

Christina Phillips is a Microsoft Certified Trainer and Dynamics GP Certified Professional. She is a supervising consultant with BKD Technologies, providing training, support, and project management services to new and existing Microsoft Dynamics customers. This blog represents her views only, not those of her employer.

Tuesday, January 10, 2012

Local Taxes Set Up As Deductions?

It is not unusual, in my experience, for some local taxes to be set up as deductions.  This most commonly occurs with an earnings tax or "head" tax that is based on an income threshold.  For example, Denver has a "head" tax that only applies an individual who earns more than $500 in a month.

As you may already know, GP doesn't have the capability out of the box to calculate a threshold other than per pay period, year to date, or life to date.  So, if we paid an employee weekly, or semimonthly but wanted a threshold to be based on a month...we would be out of luck.

For this reason, you might choose to set up your local tax as a deduction.  This would allow you to include/exclude the deduction in the build, or enter transactions for the head tax.  Of course, there are other ways to approach it including manually entering a local tax code when needed on the payroll transactions or creating a customization.

But for those of you that do use a deduction to track local taxes, it can present an issue at year end.  If you map the deduction (using the W2 Box and Label fields from the Deduction Setup and Employee Deduction Maintenance windows) to the actual local tax field on a W2, the Microsoft Dynamics GP year end closing process for payroll will ignore the deduction.  I assume this is because it knows that the local taxes set up in GP as local taxes (Payroll Local Tax Setup) belong in that field.

If we caught this before year end, we could simply code the deduction to a box and label that is not currently being used and then modify the W2 form in Report Writer so that the field prints in the local tax box instead.  But what happens if we don't catch it in time?

Fortunately, if you can produce a spreadsheet of the employee ID with the tax amount and taxable wage, you can insert it in to the UPR10106 table, which is the Payroll Year End Local Table. Admittedly, I do this sort of thing a little oddly, but here it goes...

I add a column to my excel spreadsheet that says "INSERT INTO UPR10106 (RPTNGYR, EMPLOYID, SEQNUMBR, LOCLCODE, LOCLWGES, LCLINTAX, TAXTYPE) VALUES (".

Then I create a concatenated formula in Excel that appears like this:
=CONCATENATE(F2,"2011,'", A2,"',",1,",'DENVER',",D2,",",C2,",1",")")
To break these components down:
-F2 is the field with the static text mentioned above
-2011 is the hard coded reporting year for the W2
-A2 is the field with the Employee ID
-1 is the hard coded sequence number (I will discuss this more below)
-DENVER is the hard coded W2 Box Label/Local Code to appear on W2
-D2 is the field with the local taxable wages
-C2 is the field with the local tax
-1 is the hard coded tax type of City Income Tax (based on drop down in W2 Local Tax window)

Of course, you could choose to source the hard coded items from columns as well if you want.  The end result of this is a series of INSERT scripts that can be run against the company database to update the UPR10106 by inserting records.

INSERT INTO UPR10106 (RPTNGYR, EMPLOYID, SEQNUMBR, LOCLCODE, LOCLWGES, LCLINTAX, TAXTYPE) VALUES (2011,'ACKE001',1,'DENVER',10000,50.00,1)

One thing to watch out for, though, is the sequence number.  For each employee, for each year, the sequence number is an incremental number.  So, for example, if an employee had two local taxes withheld, the first one would have a sequence number of 1 and the second would have a sequence number of 2.  So if you have more than once local tax, you need to adjust the script accordingly.  And if a local tax is already included in the UPR10106 table for the year you are updating, you would also need to take this in to consideration or you will get a primary key error when attempting to insert the records with a duplicate employee ID, year, and sequence number.

Good luck with year end, and always always always make a backup before attempting these or any other scripts :)


Christina Phillips is a Microsoft Certified Trainer and Dynamics GP Certified Professional. She is a supervising consultant with BKD Technologies, providing training, support, and project management services to new and existing Microsoft Dynamics customers. This blog represents her views only, not those of her employer.

Recapture Provision? What Recapture Provision?

We have had a few clients ask about the recapture provision of the payroll tax cut extension.  Essentially, the recapture provision says that if an employee makes more than a set amount in the first two months of this year, the excess has to be taxed at 6.2%.  What?  How does that work?

Well, fortunately Terry Heley at Microsoft wrote a fabulous blog post explaining this provision and why GP doesn't do it...


Check it out!

Christina Phillips is a Microsoft Certified Trainer and Dynamics GP Certified Professional. She is a supervising consultant with BKD Technologies, providing training, support, and project management services to new and existing Microsoft Dynamics customers. This blog represents her views only, not those of her employer.

Tuesday, January 3, 2012

1099 Reporting, Or Not?

Recent versions of Dynamics GP have included terrific enhancements to 1099 tracking.  The ability to track 1099 amounts per type and box at a transaction level allows users to track in greater detail without having to assume that all of a vendor's payments go to the same 1099 type and box number.

Along with these enhancements, though, there are not a lot of great reporting capabilities to review this information by type and box.  Of course, you can inquire on the information easily (Inquiry--Purchasing--Vendor 1099 Details, Cards--Purchasing--1099 Details).

Cards--Purchasing--1099 Details
1099 Details window

The issue with these windows is that you have to review the 1099 information vendor by vendor.  This is normally fine if you have a small amount of 1099 vendors.  But for those users who have 100, 200, or even 500 1099 vendors, a report or export is much easier to use.

So, we look to SmartList, where there are 1099 fields available...

Microsoft Dynamics GP--SmartList--Purchasing--Vendors
With 1099 fields added

However, if we look at the 1099 fields available directly in SmartList, we will see that they are the "Amounts Since Last Close" summary fields. Which means that they are not date sensitive (they would be based on the last time you closed the calendar year for Purchasing), and they also do not include amounts by 1099 type and 1099 box although you can display the vendor's default 1099 type.  So, this may work okay if a vendor uses only one type and one box, and you are confident that you closed the Purchasing module on time for the prior calendar year and did not post back to the prior year or forward to the new year.

So, what about reporting?  Yes, you can print a report from Cards--Purchasing--1099 Details, but is only available for one vendor at a time.  In the past, I would tell users to print the 1099 edit list from Routines--Purchasing--Print 1099.


Routines--Purchasing--Print 1099
1099 Edit List

Although this report is based on the actual transaction dates (therefore it is date sensitive), it does not break out the 1099 amounts by 1099 type and box.  So, although it may work better than the SmartList, it still would work best for those vendors that use the same 1099 type and box.

So what to do if you have a variety of vendors with a variety of 1099 types and boxes?  Aside from actually printing the 1099 themselves to review?  Well, if you have SmartList Builder, it is not all that hard to create a summary SmartList to display 1099 information.  There are two primary tables involved:


The Purchasing 1099 Period Detail table includes the key fields necessary for reporting the 1099 amounts by box and type:


It is important to note that the 1099 Box Number noted in this table is NOT the actual 1099 box number.  Rather it is an incremental number assigned to the boxes in order.  So, for example the second box on a 1099-DIV is actually labeled as box 1b on the 1099 form but it would be noted as 1099 Box Number 2 in this table.   I also added the PM Vendor Master file to the SmartList, in order to pull the vendor's Tax ID Number and address.

Now, at this point, you could use this SmartList as is but you would get multiple lines for each vendor since it would list out the amounts per box per period.  If you would prefer to condense the SmartList to one line per vendor, per type, and per box you can make it a summary SmartList.  To do this, you can click the Options button in the upper right corner of the SmartList Builder window.


SmartList Builder Options button
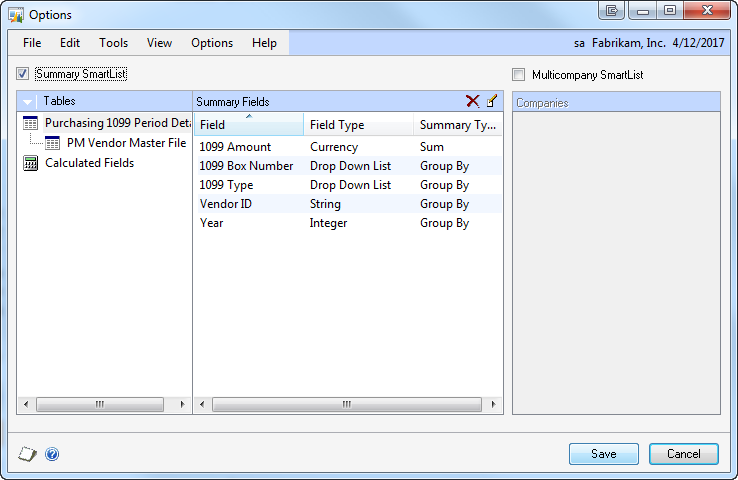
Options Window
Select table to display summary options

Mark the Summary SmartList checkbox in the Options window to convert the SmartList to a summarized a version.  Then for each field available in the SmartList, you must select the Summary Type.  To change the Summary Type, double-click on the field.  In the first screenshot above, we are selecting the options for the fields in the Purchasing 1099 Period Details SmartList.  Note that we select the option of Group By on those fields we want to summarize by... in this case, by 1099 Box Number, 1099 Type, Vendor ID, and Year.  The 1099 Amount field is then set to be a Sum. 

For the PM Vendor Master File, we have set many of the fields to Maximum.  Keep in mind that since we are grouping by Vendor ID, the fields should be the same for each vendor.  So when we say to pull the Maximum, we are simply saying to pull that common value for the vendor.  In this case, we also set to group by the Vendor Check Name.  This is redundant, though, since we have already grouped by vendor ID.

You may also want to add a restriction to display only those summaries with a 1099 amount greater than zero. 

SmartList Builder Restrictions button
Restrictions window

Click the Restrictions button at the top of the SmartList Builder window to add a restriction. 

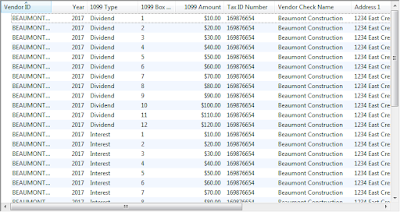
The final SmartList will appear something like this:

Summary SmartList Grouped by 1099 Box Number, 1099 Type, Year, and Vendor ID

The final SmartList will display the summarized information, including the 1099 Amount by type and box number (keeping in mind that is the sequential box number).  For extra credit, you can even create a series of calculated fields to break the amount out in the correct box labels.  If you do this using a CASE statement to test for the sequential box number, a couple things to keep in mind...

1.  Because box labels change for 1099 type, I would suggest creating a separate SmartList for each 1099 type and adding a restriction to only display one 1099 type per SmartList.
2.  You will want to remove the group by on the 1099 Box Number and not display it in the SmartList.  As you will be summarizing only by the 1099 Type, Year, and Vendor ID.  The calculated fields will then display (with a separate column for each box) the amounts broken out by box.

Here is a sample of a CASE statement used to pull an amount for a specific box.  You will need a separate calculated field for each box on the 1099.

CASE WHEN {Purchasing 1099 Period Detail:1099 Box Number}= '1' THEN {Purchasing 1099 Period Detail:1099 Amount} ELSE 0.00 END

Good luck and happy new year!!

Christina Phillips is a Microsoft Certified Trainer and Dynamics GP Certified Professional. She is a supervising consultant with BKD Technologies, providing training, support, and project management services to new and existing Microsoft Dynamics customers. This blog represents her views only, not those of her employer.

Thursday, October 27, 2011

TXSHANTY and Tax Sheltered Deductions

Whew! Back from vacation and a whirlwind week before and after!

I have been battling a bit of an odd issue for a client regarding FUTA and SUTA taxable wages.  Let me start by giving you some background:

1. Deduction configured as non-TSA, no tax sheltered boxes marked (Setup-Payroll-Deduction, Cards-Payroll-Deduction)

2. Activity posted using the deduction code

3.  Deduction setup changed to now be TSA, with three of the tax sheltered boxes marked (Setup-Payroll-Deduction) and change to set up rolled down

4.  Deduction maintenance not updated with new tax sheltered settings, as their was already activity on the code (Cards-Payroll-Deduction)

So, the bottom line is that the employee deduction maintenance (Cards-Payroll-Deduction) showed no tax sheltered checkboxes marked but the setup did (Setup-Payroll-Deduction).  Normally, this would not be a problem.  New employees would get the new settings while older employees would not.  But then the weirdness began :)

When printing the FUTA and SUTA summary reports, it was noticed that the wages were off by the amount of these deductions.  Both FUTA and SUTA were set  up (Setup-Payroll-Unemployment Tax) to NOT include any TSA deductions as wages.  But, in this case, the deduction in question was NOT sheltered.  So it should NOT have been excluded from wages. 

If we changed the FUTA and SUTA setup to include the deduction as wages, it fixed the employees who did NOT have tax sheltered flags marked.  But it created another problem, since it also now included the deduction as wages for employees who DID have the tax shelted flags marked.  Eek.  Fun.

So why was it sheltered the deductions that were NOT marked as tax sheltered?  All 'cuz of TXSHANTY.  Many thanks to Michelle Blaser at Microsoft, who asked the question and had us check this setting.  In the UPR00500 field there is a field called TXSHANTY.  This is a boolean field, with a zero if NONE of the tax sheltered checkboxes are marked (SHFRFEDTX, SHFRFICA, SHFRSTTX, SHFRLCLTX) or a 1 id any of the tax sheltered checkboxes are marked.

In the case of these employees that had deductions that were NOT marked as tax sheltered, the TXSHANTY setting was 1 although the tax sheltered checkboxes were all zeroes  (SHFRFEDTX, SHFRFICA, SHFRSTTX, SHFRLCLTX).  How could this happen?

Well, with a little testing with Microsoft we found that the rolldown from the setup did not rolldown the tax sheltered checkboxes (SHFRFEDTX, SHFRFICA, SHFRSTTX, SHFRLCLTX) because there was activity but it was still updating the TXSHANTY field behind the scenes.  The interesting part of this is that there is not logical situation where TXSHANTY would be 1 while all of the other checkboxes are zero.

So we used the following scripts to identify and correct the affected records:

--Run select statement to verify number of records to be affected
select * from UPR00500 where TXSHANTY=1 and SFRFEDTX=0 and SHFRFICA=0 and SHFRSTTX=0 and SFRLCLTX=0
--Run update statement to set Tax Sheltered Annuity field to 0 where are all Tax sheltered tax fields are 0
update UPR00500 set TXSHANTY=0 where TXSHANTY=1 and SFRFEDTX=0 and SHFRFICA=0 and SHFRSTTX=0 and SFRLCLTX=0
--Verify number of affected rows against select statement rows

Once we did this, FUTA and SUTA now calculate correctly per the settings in GP.  On an interesting side note, we also found that something in GP might be resetting the TXSHANTY to zero, although we could not figure out what-- we just noticed that over time (with no as zero.  Odd.

Microsoft is working on writing this up as a quality report, but I thought I would share it with you all in case you run across the same oddity!

Christina Phillips is a Microsoft Certified Trainer and Dynamics GP Certified Professional. She is a supervising consultant with BKD Technologies, providing training, support, and project management services to new and existing Microsoft Dynamics customers. This blog represents her views only, not those of her employer.

Wednesday, October 12, 2011

Word Templates and Synchronization

Yet again, the Developing for Dynamics GP blog has saved me!  Having an issue with a field not printing on a Microsoft Word template, my forehead was bruised from beating my head against a desk...and then I stumbled upon this great little article.  What a lifesaver if you are having issues with fields not printing on the template, although they do print properly on the report in GP.

http://blogs.msdn.com/b/developingfordynamicsgp/archive/2011/05/06/keeping-word-templates-in-synch-with-report-writer.aspx

Christina Phillips is a Microsoft Certified Trainer and Dynamics GP Certified Professional. She is a supervising consultant with BKD Technologies, providing training, support, and project management services to new and existing Microsoft Dynamics customers. This blog represents her views only, not those of her employer.

Sunday, October 9, 2011

Did You Know? Extender Setup

Yes, I am one of the those people that read and re-read the training manuals each time I teach a class or train a customer.   So, I was rereading the Extender manual a few weeks ago, and came across an interesting tidbit that many of you may already know.  It is recommended that the Auto-Update SmartLists option in the Extender Options window (Microsoft Dynamics GP-Tools-Extender-Options) only be marked in one company.


This is due to the fact that SmartLists is system wide, while Extender windows are company-specific.  The recommended workaround for this is to mark the option in the "main" company and complete all of your Extender configuration in that same company then export/import the necessary windows to the other companies.  There is a KnowledgeBase article that describes the issue and recommended workaround, find it here.
  
In my opinion, this is one of those things that I wouldn't have even thought to worry about.  But it can cause a lot of issues including inaccurate/incorrect results in SmartList if you do have the Auto-update option marked in multiple companies.

Would love to hear from anyone who has run in to issues related to this setting, and how you have managed the "develop all windows in one company" approach when Extender is being used extensively in multiple companies in the same installation.

Christina Phillips is a Microsoft Certified Trainer and Dynamics GP Certified Professional. She is a supervising consultant with BKD Technologies, providing training, support, and project management services to new and existing Microsoft Dynamics customers. This blog represents her views only, not those of her employer.

Adding Fields To Word Templates

Sometimes things are much easier than you would even think possible.  I know, I know, hard to believe, right?  But a  great example of this is adding fields to a Word Template in Microsoft Dynamics GP.  So, for example, let's say that I want to add the order date to the SOP Blank Invoice Word Template.

The Report Writer report actually feeds the XML for the Word Template, so for the field to be available in the Word Template, you must first add it to the report in Report Writer (Microsoft Dynamics GP-Tools-Customize-Report Writer)


Add the field to the correct section of the report, although it doesn't matter cosmetically where it appears. You will also want to make sure that you have security to print the modified report, to ensure that it is pulling the proper data (Microsoft Dynamics GP-Tools-Setup-Alternate/Modified Forms and Reports ID, User Security).

Next, open the Template Report Maintenance window, Reports-Template Maintenance.  Click on the Report Name dropdown, and select More Reports to open the Reports menu.


Select the Product (in this case, Microsoft Dynamics GP), the Series (in this case, Sales), and the Status should be Modified.  Selecting Modified for the Status matches the template to the modified report, enabling the additional fields to be pulled on to the template.  Click Select to return to the Report Template Maintenance window.  Then click the New button to create a new template.


You can choose to create a Blank Template, or From Existing Template.  If you choose From Existing Template, select the Template to copy from. Even if you copy from an existing template, the additional fields from the modified report will still be available to be added to the report.   


Next, click Modify to open the selected template in Microsoft Word.  Note that the Order Date field is now available for selection.


Now you can add the field to the template as needed.  Easy, huh?  The downside is that you do need to know Report Writer in order to modify the underlying report so that the field is available in the template.  But the good news is that is a rather simple process to make the new fields available on the template.

Good luck! And feel free to share any other tips and tricks you have run across while working with the Word Templates.

Christina Phillips is a Microsoft Certified Trainer and Dynamics GP Certified Professional. She is a supervising consultant with BKD Technologies, providing training, support, and project management services to new and existing Microsoft Dynamics customers. This blog represents her views only, not those of her employer.

Wednesday, September 28, 2011

Hidden Gem- Check Distribution Report

Do you need a report to show you the invoices that were paid by a particular check?  How about viewing the distributions associated with the invoices that were paid by a particular check?  These are fairly common requests, and often lead to a bit of head scratching for users.  We look in SmartList, and there really isn't a great option (unless you have SmartList Builder-- but even then, you have to create it) since the relationship between a check and invoices can be one to many (one check can pay many invoices).

So when I get this question, and the client doesn't own SmartList Builder or they want a solution that is quick and easy, I point them to the Check Distribution Report.

Reports-Purchasing-Check Information-Check Distribution
Click New Option

When setting up the report option, you can restrict to a range of Vendor IDs, Dates, or Check Numbers.  You can also select to Include Dist Types, to include only PURCH type distributions for example.

Check Distribution Report


The report displays each check followed by each invoice paid.  The distributions appear directly below each invoice that is listed.  This report can be quite handy when trying to track back checks to their associated invoices. 

I know that similar information can be displayed using SmartList Builder, but this report is a great option when you need a quick solution and/or you don't own SmartList Builder.

Christina Phillips is a Microsoft Certified Trainer and Dynamics GP Certified Professional. She is a supervising consultant with BKD Technologies, providing training, support, and project management services to new and existing Microsoft Dynamics customers. This blog represents her views only, not those of her employer.

Adding Employer Tax Fields To Payroll Check Register

We had an issue pop up this month that was a bit puzzling on the surface.  When a client printed the payroll Check Register when the payroll posted, they were getting different results than when they reprinted the same report using Reports-Payroll-Reprint Journals-Check Register.

On the standard Check Register and Reprint Check Register reports, the Employer FICA taxes are totaled in to one field called Employer FICA Owed.  However, on the client's reports, this amount was also broken out in to two additional fields for Employer FICA/Social Security and Employer FICA/Medicare.  Given that these fields are not standard on the report, we knew (and confirmed through Microsoft Dynamics GP-Tools-Customize-Customization Maintenance) that the reports were modified.

In looking at these modified versions of the reports, we noticed that all of the fields matched with the exception of the Employer FICA/Social Security and Employer FICA/Medicare fields that were added to the reports.  But, why would the fields be different?  If the same fields were added to the reports?  Well, that is the big IF.

So, I opened each report in Report Writer, and here is what I found.  There are a total of four fields that store Employer FICA information, two for Social Security and two for Medicare.  When working with the Reprint Check Register report, the fields are located in the Payroll Check History table (for the Check Register report, the table is Payroll Work Header): Employer FICA/Med Tax On Tips, Employer FICA/Medicare Withholding, Employer FICA/SS Tax On Tips, and Employer FICA/Social Security Withholding.

In the client's case, one report was modified to pull only the "withholding" fields while the other report was modified with calculated fields to combine the "withholding" field with the corresponding "tax on tips" field (e.g., Employer FICA/Medicare Withholding + Employer FICA/Med Tax On Tips).  And because the client had employees with tips, the amount displayed for each of the FICA fields was off by the FICA on tips.

So, lesson learned, if you want to add the Employer FICA/Medicare and Employer FICA/Social Security to the payroll check register reports, make sure you either display all four fields or create calculated fields to summarize them appropriately.

Christina Phillips is a Microsoft Certified Trainer and Dynamics GP Certified Professional. She is a supervising consultant with BKD Technologies, providing training, support, and project management services to new and existing Microsoft Dynamics customers. This blog represents her views only, not those of her employer.

Monday, September 19, 2011

Using Custom Icons to Differentate GP Versions

I develop Dynamics GP customizations and integrations for alot of different customers, and currently they are running GP 9, GP 10, GP 2010, and GP 2010 R2 (thankfully nothing older than GP 9!).  Most use only the core GP modules, while some use Project Accounting, and a few use Analytical Accounting.  Because of this, I have to maintain several different versions of GP on multiple virtual servers.

This is a pretty standard situation, but one small annoyance I have had is that the GP 10 icon is the same as the GP 2010 icon.  So if I have both versions installed on a server, I have to try and differentiate the icons on my start menu, task bar, and desktop so that I can tell which is GP 10 versus 2010.  And then I have one machine with GP 2010 and a separate install of GP 2010 R2, so that is also fun.

I don't know why it didn't occur to me earlier, but tonight I thought I would try and create custom icons for each version of GP.  If you are using Visual Studio 2008 or Visual Studio 2010, it's a pretty simple process.

I already have a standard Dynamics GP icon file that I created several years ago, or if you want to create your own, you can use an icon editor or extractor.

I just made a copy of the icon file, opened it in Visual Studio, and then added a basic "2010 R2" to the 32x32 icon, and just an "R2" to the 24x24 and 16x16 icons.  I've made a similar one for GP 10.  And now I can use the same technique to create one for my separate Analytical Accounting, Project Accounting, and Manufacturing installs.


Obviously desktop icons have a text label, but the custom icons are very helpful for the icons in the system tray.


Unfortunately, while writing this, I just discovered one very big limitation.  The Visual Studio 2010 icon editor does not support editing of 32-bit (color depth) icons.  Since I am using my custom icons on a virtual server that I access via RDP, the 16-bit icons are fine for me.  But if you want to make 32-bit versions, you'll need a real icon editor, such as the very good Axialis Icon Workshop, or perhaps there is a free product available.

It appears that Axialis Icon Workshop includes a Visual Studio 2010 Add In, so that's a nice feature if you do much icon editing.

Steve Endow is a Dynamics GP Certified Trainer and Dynamics GP Certified IT Professional in Los Angeles.  He is also the owner of Precipio Services, which provides Dynamics GP integrations, customizations, and automation solutions.

http://www.precipioservices.com

Friday, September 9, 2011

Credit Limits and Sales Process Holds

I just finished up a post for the BKD blog on sales process holds, and I thought I might spend a little time here on one the neat side benefits of using process holds.  For those of you that are not familiar with them, sales process holds are user-definable holds that you can assign to Sales Order Processing transactions (Quotes, Orders, Invoices, etc) that can prevent the document from being printed, posted, fulfilled, and/or transferred.  These holds are quite handy, as they can be applied to ranges of documents, individual documents, or even default when certain document types are used.

There is a bit of a "bonus" to using sales process holds in tandem with customer credit limits. You can actually specify a process hold to be automatically assigned to a document when the customer exceeds their credit limit.  For example, let's say that your credit manager has to review all documents that exceed a customer's credit limit.  By assigning the process hold automatically, the credit manager could complete his or her review and remove the holds on those documents that can continue to be processed. 

The setup for this feature is quite simple.  Start by setting up the process hold, Microsoft Dynamics GP-Tools-Setup-Sales-Process Holds.


Enter the Process Hold ID and Description.  Specify a Password if you want users to enter a password in order to remove the hold.  And then mark the items you want to "Apply Hold To".  Click Save.

Next, you need to specify the hold on the specify invoice and order types that should automatically have a credit limit hold applied.  Go to Microsoft Dynamics GP-Tools-Setup-Sales-Sales Order Processing Setup.  Click the Sales Document Setup button and choose either Invoice or Order.


Select the Order or Invoice ID, and then select the appropriate process hold in the Credit Limit Hold ID field.  Click Save.  Now, when you enter an order using this Order ID and the customer exceeds their credit limit, the process hold specified will be automatically assigned to the order.  In order for this functionality to work, you CANNOT have a password specified for the "Exceed Credit Limit" option in Receivables Management Setup (Microsoft Dynamics GP-Tools-Setup-Sales-Receivables).
When entering an order that exceeds the customer's credit limit, a warning will be displayed.  Choose Continue, and the hold will automatically be applied to the order when it is saved.


Note that the CREDIT process hold has automatically been applied.  How easy is that (to borrow from the fabulous Ina Garten)?

Christina Phillips is a Microsoft Certified Trainer and Dynamics GP Certified Professional. She is a supervising consultant with BKD Technologies, providing training, support, and project management services to new and existing Microsoft Dynamics customers. This blog represents her views only, not those of her employer.

Tuesday, August 30, 2011

The Not So New World Order- Cost Variances and Dynamics GP

Once upon a time, Dynamics GP calculated cost variances for FIFO/LIFO perpetual valuation method items in purchase order processing, sales order processing, and/or inventory control and didn't always post to the general ledger.  This was widely, I think, understood and the importance of printing and reviewing the Cost Variance Journal was drummed in to users collective noggins everywhere.  And then came Dynamics GP 9.0.  Yes.  9. Point. O.

Why am I writing about this now?  Well, although there are definitely articles out there on cost variances, it seems like most of them are from the pre-9.0 world or have not been completely updated correctly.  So, after a lovely chat with Pam Peterson at Microsoft today, I thought...heck, why not, let's lay it all out for everyone!

In the purchase order processing training manual, there is a section (at the end of Receivings Transaction Entry) that outlines three different kinds of cost variances related to FIFO/LIFO perpetual items.  Here they are in a nutshell.

Scenario #1
  • Item has a quantity on hand of 5 with a current cost of $1
  • A quantity of 15 is sold, causing the item to go negative, this sale would be recorded with a unit cost of $1
  • So, in the IV10200 (Inventory Purchase Receipts table), you would now have an override layer for the amount that was overriden (in this case, 10)
  • A quantity of 20 is now received and invoiced in purchasing, with a unit cost of $1.25
  • This creates a variance of $2.50 (.25 variance X 10) for COGS and Inventory
  • This variance will print on the Cost Variance Journal when the receipt is posted
  • Now, here is where it gets tricky...
    • In GP 8.0 and earlier, this variance would NOT be automatically created in the GL
    • In GP 9.0 and later, this variance IS automatically created in its own GL entry
On a side note, the adjustment outlined above is only created automatically if the transaction that caused the override was recorded in the system in GP 9.0 or later.  This ensures that the "outflow" record is properly recorded in the IV10201 (Inventory Purchase Receipts DetaiL) table.  When upgrading from versions earlier than 9.0, the system arbitrarily selects the most recent receipt for an item and creates a dummy outflow for it only.  For this reason, if you test this process using an item in Fabrikam that is already negative, it will most likely NOT create the adjustment automatically.  This is due to the fact that the data in Fabrikam has been upgraded from version to version.  If you want to test out this scenario, make sure you do the whole process, and don't just start with an item that is already negative.

Scenario #2
  • Item has a positive quantity on hand of 10
  • A quantity of 10 is received in purchasing, with a unit cost of $1
  • A quantity of 10 is then invoiced in purchasing, with a unit cost of $1.25
  • This results in a $2.50 variance between the original cost posted and the the invoice (.25 variance X 10)
  • In this case, the difference is handled in the posting of the invoice.  It will be recorded to the inventory account or to the purchase price variance account (depending on if revalue has been selected on the Item Purchasing Options, Cards-Inventory-Item Purchasing Options).
  • The Purchasing Invoice Cost Variance Journal will print to detail the variance and will note that no manual adjustment needs to be made to COGS/Inventory.
Scenario #3
  • Item has a positive quantity on hand of 10
  • A quantity of 10 is received in purchasing, with a unit cost of $1
  • A quantity of 15 is sold to a customer, with a unit cost of $1
  • A quantity of 10 is then invoiced in purchasing, with a unit cost of $1.25 (price to customer $3/each)
  • This results in a $1.25 variance between the original cost posted and the the invoice (.25 variance X 5)
  • In this case, the difference is also handled in the posting of the invoice.  It will be recorded to cost of goods sold, inventory, and purchase price variance (if the item is not marked to revalue).
  • The Purchasing Invoice Cost Variance Journal will print to detail the variance and will note that no manual adjustment needs to be made to COGS/Inventory.
Hope this helps to simplify cost variances, and the associated GL impact in GP.

For more information on the GL entry that is created by the variances, refer to TK #2448193.  And for more information on cost variances and perpetual valuation methods, including average perpetual, refer to this article.

Christina Phillips is a Microsoft Certified Trainer and Dynamics GP Certified Professional. She is a supervising consultant with BKD Technologies, providing training, support, and project management services to new and existing Microsoft Dynamics customers. This blog represents her views only, not those of her employer.

Wednesday, August 17, 2011

Sherlock Holmes I Am Not- Finding Missing Deductions and Benefits

This week I am spending a couple of days back in the old neighborhood (Denver, Colorado) training a client on reporting tools (Report Writer, SmartList Builder, and SQL Reporting Services).  After spending this morning discussing table structure and selecting a reporting tool, we dove in to working on reports this afternoon.  In our brainstorming session for reporting ideas/issues, I was asked for a way to "check" if employees had been set up for the occupational tax here in Denver.  We do this by assigning to a benefit and deduction for the "head tax", rather than using the local tax feature in GP as there are some unique aspects to how Denver calculates the tax.

It is easy enough with SmartList or even Report Writer to test for those that do have the benefit or deduction.  But it becomes a little more difficult to test for something that is not there.  Especially when the employees would have other deductions and benefits, so we really only want to know those that are not set up for these specific codes.  So after a lovely visit to the new IKEA store here in Colorado (oh, my, yes I love me IKEA), and a decent dinner, I came back to the hotel to chew on how to best test for something not existing.  And in that, I found my answer...the NOT EXISTS function in SQL.  Ah, yes. 

Here is what I came up with to test for both scenarios.  The first part tests for the OCCPAT deduction, and displays the employee ID, name, and a message if it does not exist for a record.  And then the second part tests for the corresponding OOCCPUP benefit and returns a similar set of data.  One lovely list.  To be included in my lovely SQL report.

SELECT a.employid, a.frstname, a.lastname, 'NO OCCPAT Deduction' from UPR00100 as a where not exists (select * from UPR00500 as b join UPR00100 as c on c.employID=b.employID where c.employid=a.employid and b.deducton='OCCPAT') and a.inactive=0
UNION
SELECT a.employid, a.frstname, a.lastname, 'NO OOCCUP Benefit' from UPR00100 as a where not exists (select * from UPR00600 as b join UPR00100 as c on c.employID=b.employID where c.employid=a.employid and b.benefit='OOCCUP') and a.inactive=0

Christina Phillips is a Microsoft Certified Trainer and Dynamics GP Certified Professional. She is a supervising consultant with BKD Technologies, providing training, support, and project management services to new and existing Microsoft Dynamics customers. This blog represents her views only, not those of her employer.