Showing posts with label year end. Show all posts

Tuesday, January 3, 2012

1099 Reporting, Or Not?

Recent versions of Dynamics GP have included terrific enhancements to 1099 tracking.  The ability to track 1099 amounts per type and box at a transaction level allows users to track in greater detail without having to assume that all of a vendor's payments go to the same 1099 type and box number.

Along with these enhancements, though, there are not a lot of great reporting capabilities to review this information by type and box.  Of course, you can inquire on the information easily (Inquiry--Purchasing--Vendor 1099 Details, Cards--Purchasing--1099 Details).

Cards--Purchasing--1099 Details
1099 Details window

The issue with these windows is that you have to review the 1099 information vendor by vendor.  This is normally fine if you have a small amount of 1099 vendors.  But for those users who have 100, 200, or even 500 1099 vendors, a report or export is much easier to use.

So, we look to SmartList, where there are 1099 fields available...

Microsoft Dynamics GP--SmartList--Purchasing--Vendors
With 1099 fields added

However, if we look at the 1099 fields available directly in SmartList, we will see that they are the "Amounts Since Last Close" summary fields. Which means that they are not date sensitive (they would be based on the last time you closed the calendar year for Purchasing), and they also do not include amounts by 1099 type and 1099 box although you can display the vendor's default 1099 type.  So, this may work okay if a vendor uses only one type and one box, and you are confident that you closed the Purchasing module on time for the prior calendar year and did not post back to the prior year or forward to the new year.

So, what about reporting?  Yes, you can print a report from Cards--Purchasing--1099 Details, but is only available for one vendor at a time.  In the past, I would tell users to print the 1099 edit list from Routines--Purchasing--Print 1099.


Routines--Purchasing--Print 1099
1099 Edit List

Although this report is based on the actual transaction dates (therefore it is date sensitive), it does not break out the 1099 amounts by 1099 type and box.  So, although it may work better than the SmartList, it still would work best for those vendors that use the same 1099 type and box.

So what to do if you have a variety of vendors with a variety of 1099 types and boxes?  Aside from actually printing the 1099 themselves to review?  Well, if you have SmartList Builder, it is not all that hard to create a summary SmartList to display 1099 information.  There are two primary tables involved:


The Purchasing 1099 Period Detail table includes the key fields necessary for reporting the 1099 amounts by box and type:


It is important to note that the 1099 Box Number noted in this table is NOT the actual 1099 box number.  Rather it is an incremental number assigned to the boxes in order.  So, for example the second box on a 1099-DIV is actually labeled as box 1b on the 1099 form but it would be noted as 1099 Box Number 2 in this table.   I also added the PM Vendor Master file to the SmartList, in order to pull the vendor's Tax ID Number and address.
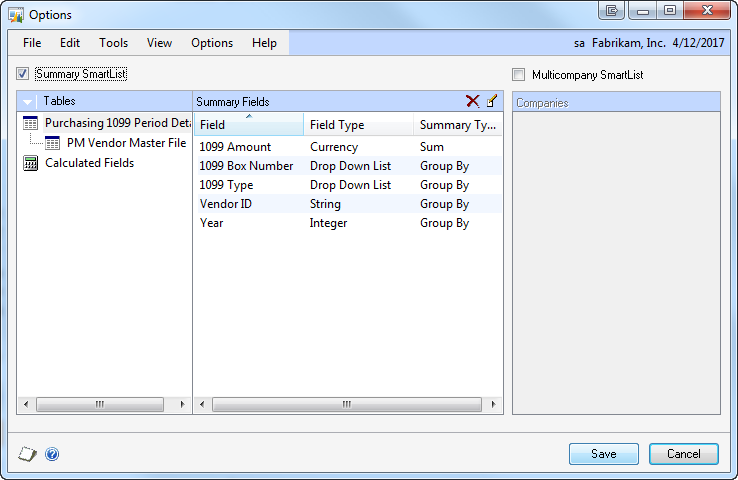
Now, at this point, you could use this SmartList as is but you would get multiple lines for each vendor since it would list out the amounts per box per period.  If you would prefer to condense the SmartList to one line per vendor, per type, and per box you can make it a summary SmartList.  To do this, you can click the Options button in the upper right corner of the SmartList Builder window.


SmartList Builder Options button
Options Window
Select table to display summary options

Mark the Summary SmartList checkbox in the Options window to convert the SmartList to a summarized a version.  Then for each field available in the SmartList, you must select the Summary Type.  To change the Summary Type, double-click on the field.  In the first screenshot above, we are selecting the options for the fields in the Purchasing 1099 Period Details SmartList.  Note that we select the option of Group By on those fields we want to summarize by... in this case, by 1099 Box Number, 1099 Type, Vendor ID, and Year.  The 1099 Amount field is then set to be a Sum. 

For the PM Vendor Master File, we have set many of the fields to Maximum.  Keep in mind that since we are grouping by Vendor ID, the fields should be the same for each vendor.  So when we say to pull the Maximum, we are simply saying to pull that common value for the vendor.  In this case, we also set to group by the Vendor Check Name.  This is redundant, though, since we have already grouped by vendor ID.

You may also want to add a restriction to display only those summaries with a 1099 amount greater than zero. 

SmartList Builder Restrictions button
Restrictions window

Click the Restrictions button at the top of the SmartList Builder window to add a restriction. 

The final SmartList will appear something like this:
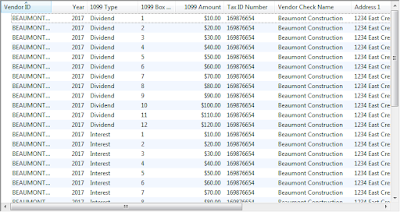
Summary SmartList Grouped by 1099 Box Number, 1099 Type, Year, and Vendor ID

The final SmartList will display the summarized information, including the 1099 Amount by type and box number (keeping in mind that is the sequential box number).  For extra credit, you can even create a series of calculated fields to break the amount out in the correct box labels.  If you do this using a CASE statement to test for the sequential box number, a couple things to keep in mind...

1.  Because box labels change for 1099 type, I would suggest creating a separate SmartList for each 1099 type and adding a restriction to only display one 1099 type per SmartList.
2.  You will want to remove the group by on the 1099 Box Number and not display it in the SmartList.  As you will be summarizing only by the 1099 Type, Year, and Vendor ID.  The calculated fields will then display (with a separate column for each box) the amounts broken out by box.

Here is a sample of a CASE statement used to pull an amount for a specific box.  You will need a separate calculated field for each box on the 1099.

CASE WHEN {Purchasing 1099 Period Detail:1099 Box Number}= '1' THEN {Purchasing 1099 Period Detail:1099 Amount} ELSE 0.00 END

Good luck and happy new year!!

Christina Phillips is a Microsoft Certified Trainer and Dynamics GP Certified Professional. She is a supervising consultant with BKD Technologies, providing training, support, and project management services to new and existing Microsoft Dynamics customers. This blog represents her views only, not those of her employer.

Tuesday, January 25, 2011

Don't forget your keys (and the taxable wages)!

I have had a few support issues in the past couple weeks regarding the taxable wages field on the payroll manual checks window.  Here is a few scenarios that come up, most often when beginning balances have been entered previously:

1.  Federal taxes are correct, but Federal wages are not
2.  FICA/S and/or FICA/M is correct, but the associated wages are not
3.  Federal wages are off from FICA/M or FICA/S wages, but you can't identify why

How does this happen?
  • Beginning balances are entered using Transactions>>Payroll>>Manual Checks, select Beginning Balances
  • Transactions entered by employee for the different transaction types related to taxes (Federal Tax, State Tax, FICA Social Security, FICA Medicare, etc)
  • Tax amount entered properly
  • Taxable Wage field (appears below the Amount field where you enter the Tax Amount) was not entered properly
  • The result is that taxes are correct, and gross wages are correct, but the taxable wages (Fed Wages, State Wages, FICA/M Wages, etc) are not.
Another scenario that can contribute to the issues above is when an individual has wages that are subject to tax, but did not have tax withheld.  Logically, when entering beginning balances, you might just omit the Federal Tax transaction.  While that is correct in terms of not recording tax withheld, it will also cause the wages to not be recorded as taxable wages (regardless of how the pay code is set up).  So, in this scenario, you should enter the transaction for Federal Tax (or State Tax or FICA Medicare ...).  But the Amount should be zero, and the Taxable Wage should be populated with the Federal Wage amount.  This will result in no impact to the net wage (since no tax was withheld), but the wages will be reflected in Federal Wages.

What else does this emphasize?  It is very important that beginning balances be reconciled by printing the 941 report for the periods covered by the beginning balances and also by reviewing the employee summary windows.  I have even suggested that users build the year end wage file early (you can then remove it under Tools>>Utilities>>Payroll>>Remove Year End) to see if the W-2s look correct.  This reconciliation often takes a back seat, we think that we can deal with it at year end.  And although that is technically true, the earlier you reconcile and resolve errors, the less stress you will add to your first year end process!

Oh, and before I leave, how do you fix the scenarios above?  It is a pretty easy, albeit tedious, process.  Simply enter another beginning balance transaction (Transactions>>Payroll>>Manual Checks). Enter a transaction for each of the taxes, leaving the amount field blank but populating the taxable wages as needed.  Make sure you use the proper dates when entering the beginning balances, and that you only populate the taxable wages field and not the actual amount field used to record the tax amount.

Happy Year End!

Monday, January 17, 2011

Popular Payroll Year End Questions

Courtesy of a fabulous webinar by Microsoft and Terry Heley, here is the bottom line scoop on many of the questions that have been flying around with the change in the FICA rates:

Q.  What do I do if I already applied the 2011 tax tables BEFORE I built the year end wage file?
A.  Easy fix.  Manually edit the FICA/Social Security tax table (Tools>>Setup>>System>>Payroll Tax) to set the rate back to 6.2.  Build the year end wage file (Tools>>Routines>>Payroll).  Then set the rate back to 4.2% (the new rate for 2011)

Q.  Following the method above, can I rebuild the year end wage file even if I have processed payrolls in 2011?
A.  Yes, yes you can! Just make sure to change the FICA/Social Security rate in the tax tables before, and then reset it after.

Q.  Can I print my 941 for 2010 even if I have applied the tax tables for 2011?
A.  Yes, prior to the release of the update from Microsoft (scheduled for 1/24), you can simply change the tax tables as noted above and set your user date back to 2010 to print the 941.  Once the update has been released, the report will be date sensitive so you can print it for either 2010 or 2011 (based on your user date) without changing the tax tables.

Q.  What manual adjustments do I need to make prior to the release of the update from Microsoft?
A.  You only need to consider (2) things.  First, that you adjust your tax deposit to the government to include an additional 2%.  Second, you need to adjust the FICA employer expense and liability in the General Ledger for the same amount (for more information on this, refer to Mike Lupro's excellent post on this topic).

Good luck in finishing up your year end!

Take care,
Christina

Monday, January 3, 2011

Payroll FICA Fun!

Sharing Michael Lupro's recent post on the FICA changes (different rates for employee -vs- employer, oh  my!) and the adjustments you will need to make in GP until the update is released to address different employer -vs- employee rates.

http://btosteam.blogspot.com/2011/01/manual-employer-fica-tax-calculations.html

Tuesday, December 7, 2010

SmartList and Year End. A love story.

My love for SmartList knows no boundaries lately, especially when you add the capabilities of SmartList Builder in to the mix.  But that is for another day.  Today, I wanted to talk about using basic SmartList during your year end.  I have been working on a presentation for our annual year end event for customers, and thought I would share a few of my top SmartLists for year end.

In no particular order (drumroll, please!):
  • 1099 Transaction Audit- Validate 1099 amounts based on transaction detail
    • Payables Transactions
    • Add Columns
      • Document Amount 
      • 1099 Amount
      • 1099 Type
    • Search
      • 1099 Type is not equal to Not a 1099 Vendor
      • Voided is equal to No
      • Posted is equal to Yes
      • Document Date (or Posting Date, depending on preference/need) is between Beginning of Calendar Year and End of Calendar Year
  • 1099 Vendor Audit- Confirm that you have Tax IDs for all 1099 vendors
    • Vendors
    • Add Columns
      • 1099 Type
      • Tax ID Number
      • Vendor Status
    • Search
      • 1099 Type is not equal to Not a 1099 Vendor
      • Vendor Status is not equal to Inactive
  • Open Accounts Receivable- Document open AR at year end
    • Receivables Transactions
    • Add Columns
      • Current Trx Amount
    • Search
      • Current Trx Amount is greater than 0.00
      • Void Status is equal to Normal
      • Posted is equal to Yes
    • Can use a similar setup for Payables Transactions 
  • Discontinued Items- Review discontinued items to see if you would like to remove the records during year end
    • Item Quantities
    • Add Columns
      • Item Type
    • Search
      • Item Type is equal to Discontinued
      • Record Type is equal to Overall
  • Standard Cost Review- Review item standard cost for periodic valuation methods to determine if you would like to update standard cost as part of year end
    • Items
    • Add Columns
      • Valuation Method
      • Current Cost
      • Standard Cost
    • Search
      • Valuation Method is between FIFO Periodic and LIFO Periodic
  • Employee Status- Review employees to see if any records need to be inactivated
    • Employees
    • Add Columns
      • Inactive
      • Last Day Worked
    • Search (optional)
      • Inactive equals No
      • Last Day Worked is greater than 1/1/1900
  • Account Type Review- Review the account type (e.g., Balance Sheet or Profit and Loss) to ensure that account balances close properly during the financial year end close process
    • Accounts
    • Use defaults, but make sure that maximum records allows all records to be returned (check under Search for maximum records setting)
Please share any SmartLists you rely on for year end as well, and I will update the post! Happy holidays!

Tuesday, December 8, 2009

Don't you go closing my year...

Just thought I would send out a gentle reminder of the major myths regarding year end closing in Dynamics GP. As I find they surface every year, even among users who have used the system for years. So here is my top five list, please post your comments and I will update the list accordingly.

I have to wait until I have ALL my adjusting entries before I can close the GL
This is the biggest myth of all. You can actually have your cake and eat it too. GP allows you to post to the most recent historical year. So, for example, if I close 2009 I can still post adjusting entries to it. I just can no longer post adjustments to 2008. The two requirements to post to the most recent historical year are that you must mark "allow posting to history" in GL setup (Tools>>Setup>>Financial>>General Ledger) and the fiscal period must be open in Fiscal Period Setup (Tools>>Setup>>Company>>Fiscal Periods).

I am running my general ledger year end close, and it is stuck
I promise you the odds are that it is not stuck. The year end close is a pretty intensive process, so it is fairly common for a workstation to show as not responding. Please be patient. Using Ctrl-Alt-Delete to cancel out of the process is NOT recommended, and will REQUIRE you to restore a backup. And if you don't have a backup, well, that is just not fun...and will involve a nice little database fixing service from Professional Services at Microsoft. So, two lessons: have a backup and be patient.

I can view all my audit entries because I set up an audit period
This is a popular trick, to set up a 13th period in your Fiscal Period setup with the same date range as the December period. You then close December, and with the 13th audit period open, transactions will post in to that audit period. Sounds brilliant right? Well, it is...as long as you never run financial reconcile (Tools>>Utilities>>Financial>>Reconcile) on that year. As it will reattribute the postings to the earliest period with the same start date (assuming both periods were closed when you ran reconcile) or all postings (including your original Dec postings) will be attributed to the open period (if the 13th is open, and the 12th is closed). Ugh. Better choice? Set up a source document code (Tools>>Setup>>Posting>>Source Document) called AJ for Adjusting Entries and select it whenever you enter an adjusting entry instead of GJ. Then use the Cross Reference by Source Document report to view your AJs for a time period (Reports>>Financial>>Cross Reference>>Source Document).

Fixed Assets year end is so easy, I just change the year on the book right?
Nooooo! You must run the fixed asset year end closing routine (Tools>>Routines>>Fixed Assets>>Year End) in order to close the year properly. Changing the year directly on the books themselves is not recommended and will require you to restore a backup if you process transactions in the new year if you do so. Also, keep in mind, Fixed Assets is one module where you must complete all activity for the prior year and close the year BEFORE you can process activity in the new year.

I can close Receivables and Payables whenever I get around to it
Unfortunately, the payables management and receivables management year end closes are not date sensitive. This means that you need to run them as close to the actual end of year (after posting as much of the prior year activity as possible, but before you have posted to the new year) to get the most accurate close as possible. Now, the good news is that these closes only impact the "Amounts Since Last Close" summary figures for current year -vs- last year that are tracked for reports, inquiries, and Smartlist. The close will move all posted transactions to last year (regardless of their actual date) for the summaries. And the current year bucket will start over with any transactions posted after the close, again regardless of their actual posting date.

For example, let's say that on 1/1/2010 I post an entry of $500 to payables and date it 1/1/2010. I then close the year for payables on 1/2/2010. That $500 will be moved to the last year column in the "Amounts Since Last Close" summary figures even though it was posted to the 1/1/2010 date simply because it was actually posted BEFORE the year end close. By that same logic, let's say on 1/3/2010 you enter another payables entry for $1000 and post it back to 12/20/2009. Since the close has already been performed, that $1000 will be tracked in the current year column for the "Amounts Since Last Close" summary figures.

For most folks, these amount to minor differences that they generally do not notice. However, keep in mind that if you are looking at a vendor or customer summary field in SmartList, it will be using the "Amounts Since Last Close" summary figures. And if you are looking at current year -vs- last year, there may be discrepancies for the actual detail.

Well, there is my mythbusting. Please share your own myths, and how you like to bust them :) Not sure how many more blog posts I will make before the little one arrives (January 7th is coming quick) so I will go ahead and wish everyone happy holidays!

Tuesday, January 6, 2009

Year End 2008 Tips and Tricks

1. The GP 10 year end update/service pack 3 upgrade process through utilities can be run from any machine, not just the server (although it may be quicker on the server).
2. Hedge your bets, make a backup of the reports.dic before applying GP 10 SP3/year end update and then rebuild the reports dictionary after applying.
3. Remember, your user date in Dynamics GP has to be in the new year to do a check run after closing 2008.
4. Backup, backup, and oh, yeah, backup. And keep them...one from pre-year end, and one from post-year end.
5. Allow enough time to apply the updates, AND check your year end wage file.
6. In a crunch, you can let one person in to run a payroll without applying the updates to other workstations. Of course, the un-updated workstations cannot be used until the update is applied. But this will help you in a crazy pinch. And, I know, I know, it is contrary to what the guide tells you.

Now, if I can only manage to remember these little tidbits NEXT YEAR :)