Well, first I should apologize for being buried in Sure Step curriculum lately, so I have been blog-absent :) But recently I have been reminded of the importance of item setup. It seems like the bulk of issues and misunderstandings in Sales Order Processing and Purchase Order Processing can be tracked back to decisions made during the setup of items. Sometimes, users assume the system functions one way or another, but really it is the item setup that is controlling the behavior-- which could be easily changed in a lot of instances. I chalk this up the fact that the users who set up items are often not the same users entering transactions, or so much time has passed since item setup was initially done (and understood) that no one remembers why certain decisions were made (yet another argument for documentation...can you hear the collective groan from my coworkers?).
When I teach the Microsoft Dynamics GP Partner Academy for Distribution, new GP consultants are often overwhelmed by the number of item setup screens in inventory, as well as which ones may or may not be required based on how users may or may not be using SOP or POP (confused yet?). So a couple of years ago, I put together a hand out that I share with students that breaks out the different setup screens and which modules they impact. I will summarize that handout here (it's nothing fancy), but I am happy to share the actual handout with anyone who is interested-- just post a comment on this blog or email me at christinap@theknastergroup.com. Keep in mind, this is meant to be a basic breakdown to keep it simple and clear for students, as there is a lot of grey area :)
Module Settings:
Options to control how module behaves as well as defaults
Inventory Page>>Setup>>Inventory Control
Purchasing Page>>Setup>>Purchase Order Processing
Sales Page>>Setup>>Sales Order Processing
General Item Setup:
Item Class: Inventory Page>>Setup>>Item Class
Provides defaults for:
--Item: Inventory Page>>Cards>>Items
--Item Currency>>Inventory Page>>Cards>>Item Currency
--Used to determine which currencies are valid for an item in POP and SOP
Count Cycle Assignment: Inventory Page>>Cards>>Count Cycle Assignment
General Site Setup:
Site Maintenance: Inventory Page>>Cards>>Sites
Site Resource Planning: Inventory Page>>Cards>>Site Resource Planning
Provides order policy and order point defaults from site for item resource planning (below)
General Landed Cost Setup:
Landed Cost: Inventory Page>>Cards>>Landed Cost
Individual landed costs to be grouped together
Landed Cost Group: Inventory Page>>Cards>>Landed Cost Group
Landed cost groups to be assigned to item/site combinations below
Purchasing Item Setup:
Item Quantities Maintenance: Inventory Page>>Cards>>Quantities/Sites
Provides item default site, primary vendor and landed group
Item Vendor Maintenance: Inventory Page>>Cards>>Vendors
Provides vendor item number, vendor item description, default unit of measure, last originating invoice cost, and EOQ for Purchase Order Generator
Item Purchasing Options: Inventory Page>>Cards>>Purchasing Options
Provides revalue option/tolerance and U of M options
Item Resource Planning: Inventory Page>>Cards>>Item Resource Planning
Provides order policy (use PO gen), order point, order up to level, and PO gen options (along with mass update capability)
Sales Item Setup:
Item Price List: Inventory Page>>Cards>>Price List
Provides default price level (if customer or RM setup not defined with price level), default selling unit of measure, and U of M options
So, that's it :) Easy enough, right? Have a great Tuesday!
Showing posts with label purchase order. Show all posts
Showing posts with label purchase order. Show all posts
Tuesday, October 13, 2009


Tuesday, May 26, 2009
Land of the Landed Costs- Part 2
So, here I am with part two of the landed cost saga finally. Last time, we went through the process of setting up landed costs. In our example, we were setting up insurance costs so that the invoice from the insurance vendor could be matched back to the shipments received from the product vendor. But, before we get down the road that far, let's overview the three key ways that landed costs can be used.
Landed Costs by line item
Transactions>>Purchasing>>Purchase Order Entry, click on a line item, and then click the expansion arrow to the right of the Item header.
So, when we get to Transactions>>Purchasing>>Receivings Transaction Entry, the landed cost group will appear on the line item once again. You can view it in the same way as you did on the purchase order, by clicking on the line item and then clicking on the Item header expansion arrow. However, you may find it more helpful to view the actual landed costs being calculated for the line item, based on the landed cost group assigned. This can be done by clicking on the line item, and then clicking on the expansion arrow to the right of the Unit Cost header.
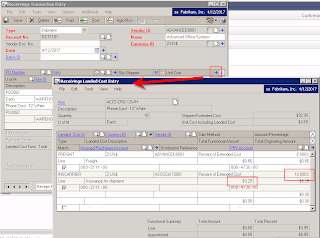
Landed Costs by line item
- Specify a landed cost group on a line item when recieved (can default from the item setup, from the purchase order, or manually entered)
- Calculated amounts can be adjusted by line item on receipt
- Specify an individual landed cost for the entire receipt document
- Apportion the amount across the items on the receipt by qty, extended cost, or weight
- Landed cost must use flat amount cost method
- Landed cost group specified by line item on receipt (default from item setup, or from the purchase order, or manually entered)
- Does not have to calculate an estimate amount on receipt, but it can.
- Individual landed cost must be set up for Invoice Match, and for Revalue for Cost Variance if applicable
- Use Enter/Match Invoices to enter an invoice from the landed cost vendor, and match it to the shipment from the product vendor
Transactions>>Purchasing>>Purchase Order Entry, click on a line item, and then click the expansion arrow to the right of the Item header.

So, when we get to Transactions>>Purchasing>>Receivings Transaction Entry, the landed cost group will appear on the line item once again. You can view it in the same way as you did on the purchase order, by clicking on the line item and then clicking on the Item header expansion arrow. However, you may find it more helpful to view the actual landed costs being calculated for the line item, based on the landed cost group assigned. This can be done by clicking on the line item, and then clicking on the expansion arrow to the right of the Unit Cost header.
You can override the amounts specified here. The percentage or amount fields will be available based on the calculation method you defined for the landed cost.
Also, on the receipt, we can do Landed Costs by Apportionment. To do this, we simply click on the Landed Costs button at the bottom of the Receivings Transaction Entry window to open the Receivings Landed Cost Apportionment window.

In this window, you can select Landed Costs to apportion across the entire receipt. You must select a landed cost that is setup with a flat amount calculation method in order to select quantity, value, or weight in the "apportion by" field.
The system calculates each method as follows:
- Quantity: (Line item's quantity shipped - the quantity rejected)/(Sum of all line items' quantity shipped- the quantity rejected)
- Value: [(Line item's quantity shipped -the quantity rejected)*Originating Unit Cost]/Sum of all line items [(quantity shipped -the quantity rejected)*Originating Unit Cost]
- Weight: (Line item's extended shipping weight)/(Sum of all line item's extended shipping weight)
In either case, Landed Cost by Apportionment or Landed Cost by Item, the distributions that result are the same:
- Debit to Inventory
- Credit to Accrued Purchases for Landed Cost (per Landed Cost Maintenance)
So, that leaves us with the last method of Landed Cost by Invoice Match. In this example, let's assume that we posted the estimated landed cost of 10% of extended for the INSCARRIER landed cost on the shipment receipt. Now, we have received an invoice from the actual insurance carrier, Associated Insurance, and find that the costs were actually much greater. Since we set up the INSCARRIER landed cost for invoice match, we can now record the invoice from Associated Insurance and match it back to the shipment from Advanced Office Systems.
To do this, we go to Transactions>>Purchasing>>Enter/Match Invoice and enter an invoice for Associated Insurance (NOT Advanced Office Systems):

There are just a few key differences in how you enter the landed cost invoice:
- Vendor ID is the landed cost vendor
- Mark the "LC" checkbox for the line item to identify it as a landed cost
- Select the landed cost to match for the item (rather than an actual item)
- Match the landed cost to the original shipment from the product vendor using the Matched to Shipment expansion button
The distributions that result depend on whether you have selected to Revalue Inventory for Cost Variance:
If you are revaluing:
- Debit to Inventory (if cost is greater than receipt)
- Debit to Accrued Purchases for Landed Cost
- Credit to Accounts Payable
If you are not revaluing:
- Debit to Purchase Price Variance for Landed Cost (if cost is greater than receipt)
- Debit to Accrued Purchases for Landed Cost
- Credit to Accounts Payable
So, I hope this helps clarify the different ways to approach landed cost in Dynamics GP. I find that some clients will use all three methods, but many also settle on one or two ways that work best for their goals. Please share your experiences, questions, etc.
Wednesday, May 13, 2009
Land of the Landed Costs- Part 1
Landed cost is the total cost it takes to "land" an item on your doorstep, including additional charges like freight, customs, and processing. More and more, I find that companies are interested in landed cost as they increase the use of international suppliers and manufacturers. By using landed cost, the "total" cost of the item is reflected in inventory and is valued as an asset, rather than immediately expensing those additional costs. Take the following example, where I purchase a widget from my European supplier:
The situation changes though, if I am using landed costs. Using the same costs above, I would value my inventory at $4400 dollars in total, or 100 widgets at $44/each. Perhaps a more accurate picture of the inventory value? In turn, this increased cost will affect my Cost of Goods Sold on the sales side, impacting my margin appropriately.
So, now that we have an example, how about talking through how Landed Costs work in Dynamics GP? With Landed Costs in Dynamics GP, these costs can be:
Cards>>Inventory>>Landed Cost
You can also select a cost calculation method, this will be how the landed cost estimate on the receipt will be calculated. If you have chosen to match invoices, the invoice amount will be compared against the original estimate on the receipt. The resulting difference can be revalued, if Revalue Inventory for Cost Variance is marked. Otherwise, the difference will post to the Purchase Price Variance account.
The GL account specified are used in the following manner:
Cards>>Inventory>>Landed Cost Groups
- Purchase 100 widgets @ $20/each
- Overseas shipping costs are $1500
- Customs, Duties, and other Processing Fees are $500
- Domestic shipping costs are $400
The situation changes though, if I am using landed costs. Using the same costs above, I would value my inventory at $4400 dollars in total, or 100 widgets at $44/each. Perhaps a more accurate picture of the inventory value? In turn, this increased cost will affect my Cost of Goods Sold on the sales side, impacting my margin appropriately.
So, now that we have an example, how about talking through how Landed Costs work in Dynamics GP? With Landed Costs in Dynamics GP, these costs can be:
- Recorded as an estimate amount on a receipt
- Matched to an invoice and revalued to provide a more accurate amount
- Landed Cost Setup: Includes setup of individual landed costs, landed cost groups, and assignment to item/site combinations
- Purchase Order Landed Cost: Assigning landed cost groups to POs
- Receivings Landed Cost: Recording of landed cost groups on Receipts
- Receivings Landed Cost Apportionment: Apportionment of landed costs across an entire receipt
- Invoicing Landed Cost: Recording invoices for landed cost vendors and matching them back to the original product receipts
Cards>>Inventory>>Landed Cost

You can also select a cost calculation method, this will be how the landed cost estimate on the receipt will be calculated. If you have chosen to match invoices, the invoice amount will be compared against the original estimate on the receipt. The resulting difference can be revalued, if Revalue Inventory for Cost Variance is marked. Otherwise, the difference will post to the Purchase Price Variance account.
The GL account specified are used in the following manner:
- Accrued Purchase Account: Used as the offset to the landed cost estimate on receipts, and cleared when the amount is invoiced or matched to invoice.
- Purchase Price Variance Account: Used for the variance between invoice and receipt when matching invoices but not revaluing.
Cards>>Inventory>>Landed Cost Groups

- A specific location
- Certain items
- A type of shipping process
Cards>>Inventory>>Quantities/Sites

This step is not required. However, if appropriate, you can assign a landed cost group to a specific item/site combination in this window. Doing this will cause the landed cost group to default on the purchase order line item, where it can be changed if necessary.
More soon on the transaction side of all of this fun!
Thursday, March 26, 2009
Upgrade Issue with Project Accounting and Purchase Order
This week I had an interesting issue pop up after an upgrade from GP9 to GP10. We have done many upgrades at this point, including ones involving project accounting, so this issue was a surprise and makes me wonder what caused it.
There were no errors during the upgrade, but post upgrade a user noticed that there were no longer any account numbers on purchase order line items. When she went to receive the purchase orders, the receipts did not default a Cost of Goods Sold account since there was no account on the line item on the purchase order. All of their purchase orders are project purchase orders, with projects and cost categories on the line items.
I looked in the database, and sure enough, in the POP10110 there were no values for the INVINDX field which stores the account index for PO lines. None. Zero. Zilch. Nada. For 7500 lines. To make sure I was not going crazy, I manually entered a purchase order and sure enough, the INVINDX populated fine. So then, to make sure it was an upgrade issue, I restored a backup from GP9 (when I knew POs and receipts were functioning, and accounts were defaulting). And in GP9, the INVINDX was blank as well.
So...I started to wonder if perhaps this was somehow related to the feature pack and changes made to the line item functionality with regards to accounts in purchase order. I still do not know for sure, but it seems like a likely reason (feel free to share if you know, or can disqualify this theory).
But I still needed to fix the issue, so I looked in the PA10601, the PA Purchase Order Line table. And the PACogs_Idx field was still populated. I checked my test purchase order that I had entered, to make sure that it populated both POP10110.INVINDX and PA10601.PACogs_Idx with the same values to make sure I was not making a bad assumption. Then it was easy enough to do a join on the PO number and ORD fields in order to update the POP10110 with the correct account index.
All is well now, and the user is able to enter and post (with accounts defaulting). Anyone else come across this?
There were no errors during the upgrade, but post upgrade a user noticed that there were no longer any account numbers on purchase order line items. When she went to receive the purchase orders, the receipts did not default a Cost of Goods Sold account since there was no account on the line item on the purchase order. All of their purchase orders are project purchase orders, with projects and cost categories on the line items.
I looked in the database, and sure enough, in the POP10110 there were no values for the INVINDX field which stores the account index for PO lines. None. Zero. Zilch. Nada. For 7500 lines. To make sure I was not going crazy, I manually entered a purchase order and sure enough, the INVINDX populated fine. So then, to make sure it was an upgrade issue, I restored a backup from GP9 (when I knew POs and receipts were functioning, and accounts were defaulting). And in GP9, the INVINDX was blank as well.
So...I started to wonder if perhaps this was somehow related to the feature pack and changes made to the line item functionality with regards to accounts in purchase order. I still do not know for sure, but it seems like a likely reason (feel free to share if you know, or can disqualify this theory).
But I still needed to fix the issue, so I looked in the PA10601, the PA Purchase Order Line table. And the PACogs_Idx field was still populated. I checked my test purchase order that I had entered, to make sure that it populated both POP10110.INVINDX and PA10601.PACogs_Idx with the same values to make sure I was not making a bad assumption. Then it was easy enough to do a join on the PO number and ORD fields in order to update the POP10110 with the correct account index.
All is well now, and the user is able to enter and post (with accounts defaulting). Anyone else come across this?
Thursday, January 8, 2009
Editing PO Distributions in Summary
So, with service packs for GP 10 (SP2 and later) and GP 9 (SP3 and later), users can no longer edit the summary distributions in Receivings Transaction Entry and Purchasing Invoice Entry. Users are required to access the Item Detail expansion, and modify the account associated with the line item.
I completely understand the change from an inventory perspective, since it has always been a difficult task to reconcile inventory to the general ledger when distributions could be modified in summary, therefore "breaking" any association between the line items and the resulting distributions. But, for the many clients that use the POP module without using inventory, this change has created a more complicated process.
At first, the majority of the complaints we received about it were related to the fact that it is more time consuming to access the Item Detail expansion than to simply edit the distributions in summary. Annoying, yes. But, yesterday, I had a client with an even more exasperating situation. In their case, they have been routinely coding single items (non inventory, of course) to multiple accounts. So, their PO may have one item, a service contract as an example, that needs to post to a variety of accounts. And, of course, it is not a fixed thing that could be addressed with an allocation account.
There is a workaround provided by Microsoft, but of course it is not ideal as it creates extraneous debit/credit transactions in the GL for non inventory items:
For non inventory items:
I completely understand the change from an inventory perspective, since it has always been a difficult task to reconcile inventory to the general ledger when distributions could be modified in summary, therefore "breaking" any association between the line items and the resulting distributions. But, for the many clients that use the POP module without using inventory, this change has created a more complicated process.
At first, the majority of the complaints we received about it were related to the fact that it is more time consuming to access the Item Detail expansion than to simply edit the distributions in summary. Annoying, yes. But, yesterday, I had a client with an even more exasperating situation. In their case, they have been routinely coding single items (non inventory, of course) to multiple accounts. So, their PO may have one item, a service contract as an example, that needs to post to a variety of accounts. And, of course, it is not a fixed thing that could be addressed with an allocation account.
There is a workaround provided by Microsoft, but of course it is not ideal as it creates extraneous debit/credit transactions in the GL for non inventory items:
For non inventory items:
- In Purchasing Distribution Entry, create a third distribution line with the same PURCH account but using an OTHER distribution type. Use this line to "wash" the original PURCH distribution.
- Enter desired distributions using the OTHER distribution type.
For inventory items, I think the complaints are less frequent because most users do have items posting to default accounts, but there are workarounds per Microsoft there as well.
For inventory items (three different options):
- Use fixed or variable allocation accounts
- Receive quantities on multiple shipments, changing account on Purchase Order as needed
- Change account on Item Maintenance or in Posting Account Setup to the appropriate default account
So, what to do? I would love to hear your thoughts, and the reactions you have gotten on this change (as necessary as it may have been from an inventory perspective).
UPDATE: Brenner from Willoware just let me know that they have included a fix for this in their GP PowerPack, www.WilloWare.com. "Not only will it allow you to again edit the PURCH distribution, but it also has a new "default" option which will calculate one distribution line per line-item received. " Thanks Brenner!
Subscribe to:
Posts (Atom)